The Eye-point (camera view) for cabview position is modified in the .cvf file, not the ENG file (although head-out is modified in the ENG file).
To alter your eyepoint in the cabview, open your .cvf file in a Unicode-aware editor such as ConTEXT Text Editor.
Here's the first part of a .cvf file:
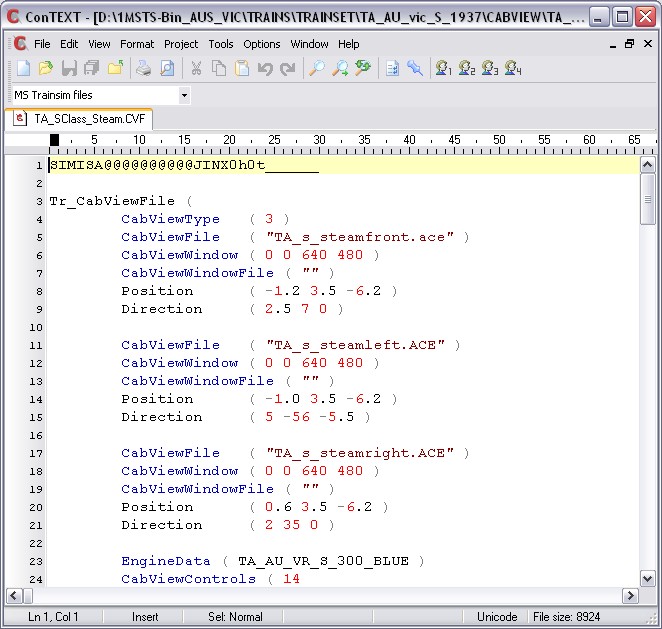
The first line of note is CabViewType ( n ). The number n refers to the type of locomotive the cab is to be used for.
- 1 = Electric
- 2 = Diesel
- 3 = Steam
Next the views are defined as front, left, right in that order. Each view has five parameters:
- CabViewFile ( filename.ace ) -- the ACE file to call;
- CabViewWindow ( 0 0 640 480 ) -- the visible view: from the days of poor memory/graphics cards (nowadays set this line as shown at left); this masked off parts of the view not required because it would be covered by the appropriate ACE file: you only see the mask if the ACE file is missing. As the cabview is based on a 640x480 view, set this parameter as shown: there's no point in going higher than this value;
- CabViewWindowFile ( "" ) -- totally useless parameter, never properly implemented: just leave a pair of double quotes here); don't omit this line as the train will not load in MSTS, returning a "Failed To Open Cabview" error message;
- Position ( x y z ); and
- Direction ( x y z ).
You alter your eye-point (camera) by altering the Position and Direction lines for each view.
Position ( x y z ): this line defines the position of the camera relative to the origin (centre) of the shape you are using: the axes x, y, z are numeric values in meters:
- x axis - right (positive) or left (negative) of the origin of the shape;
- y axis - above (positive) or below (negative - never used) the origin of the shape;
- z axis - in front of (positive) or behind (negative) of the origin of the shape.
Example: Position ( -1.2 3.5 -6.2 ) is a view 1.25m to the left of centre, 3.5m above the track and 7m behind the centre of the loco (this example from team-ALCO's S class steam locomotive).
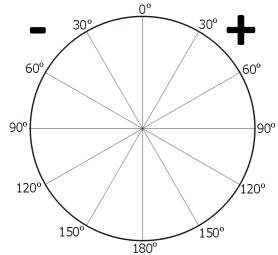
Direction ( x y z ) provides the direction the camera is pointing: the axes x, y, z are numbers (between -180 and +180) in degrees where 0 is straight ahead and
- "x" is view up (negative) or down (positive) in degrees from the initial eyepoint ;
- "y" is view left (negative) and right (positive) from the initial eyepoint (so left is -90, right is 90, rearview is 180);
- "z" is view as if you have a head tilt (positive you tilt your "head" right, negative you tilt your "head" left; this z value is probably best left at 0 (zero).
Example: Direction ( 2 35 0 ) is a view pointing down 2o, looking 35o to the right (this example from team-ALCO's S class steam locomotive - right view).