How To Make Your TSM-built Aircraft fly in MSTS
by Frank Carver (aka "Emu Farmer")

Overview

I'm going to show you the principles involved in preparing your TSM-built aircraft for flight inside MSTS.

This tutorial is for aircraft created with in TSM that have their cockpit facing to the left side of the TSM desktop as in image above.


Preparing Your Model

  1. Once you have made your aircraft in TSM, make a copy of your model and rename the copy xxxlanding.
    Please back up your "S" files before doing any Editing
     
  2. Load the model in TSM and make sure that in "Parts" you have clicked Center Axis to Origin.
     
  3. Click Edit | Select all and press the "J" key on the keyboard to join all the parts (this is easier than writing the hierarchy of 100s of pieces).
     
  4. Go into "Current Items Properties", rename "Part name" to "Aircraft".
     
  5. Click "New Box" and make a plain box of your size removing the bottom and the 4 sides, and colour the top to your choice (I make this box into an arrow shape in the direction the aircraft is to fly by closing the 2 front points).
     
  6. Click Parts | Remove Orphaned Parts | All Parts. Now lower this box about two meters below your base line or Terrain line or Grid Axis and Center Axis again in "Parts".
     
  7. Click Current Item Properties again and rename this to "Base".
     
  8. Open "Parent Part" and marry this Base name to the Aircraft name. Highlight your aircraft again making sure the Axis is at origin and click Project Properties | Anim Scenery. In "Animation Frames", insert a number anywhere from 901 to 2001 frames ( here you must always have an odd number): see below.


    Check that your Short name is what you want and click Save As.
     
  9. The "901 to 2001" is the number of frames the aircraft will travel in its flight.

    In TSM this number will be divided into two parts for an "aircraft taking off" or "aircraft landing". With the fly over" aircraft this number must not be divided.

    These frames also can control the speed of the aircraft travel; the 300 to 400 meters height is dependant on the aircraft size; a small aircraft like a Cessna might only be about 60 to 70 meters high. You can check the speed or height above track level in the Route Editor. Adjusting these values will be explained later in the tutorial.
     

Approximate Conversion from Meters to Feet

2000 meters = 6561 feet
1700 meters = 5577 feet
1000 meters = 3280 feet
400 meters = 1312 feet
300 meters = 984 feet


Making Your Aircraft Land

We are now going to make your aircraft land.

  1. Look at your plane side-on in TSM. Make sure the aircraft is highlighted, right-click "Zoom Out" repeatedly until the aircraft has nearly disappeared.
     
  2. Click on the Anim button at the top of the page and a box called "Animate Part" should open with your frame number at 2000 in the "Last Anim Frame".
     
  3. leaving the frame button on "0" move your aircraft to approx -2000 meters by 300 to 400 meters high, reading this from the bottom of the TSM page.
     
  4. When you're satisfied, press "Set Motion" in "Animate Part", then move your "Frame button" to approx 1700 meters (this will give you 300 meters of runway).
    You must move this Frame button before moving the aircraft. Move your aircraft down to your base-line and to approximately -300 meters from the centre axis.

    You might have to zoom in to make sure the aircraft is sitting on the centre axis line.
     
  5. When you are satisfied, press "Set Motion". In "Animate Part" move the frame button to 2000 and then move your Aircraft to the end of the Runway usually at Centre Axis and then Set Motion again in "Animate Part".
     
  6. That's it, now save it and then "Create TS Object File". View it in Shape Viewer and test it by clicking Animation.

The model might disappear in MSTS before you want it to. To fix this, open your "S" file and at fourth line down called Vector are a lot of numbers (xxxxx xxxxx xxxx) XXXX. These last numbers will want a 1 or 2 or up to perhaps a 7 put in front of the original number. I usually find that a 5 there is OK, but it does depend on the length of the Flight Path for the best number. You will have to test this yourself only in MSTS( it can be checked whilst in the Route Editor as well).

Please Back up your "S" files before doing any Editing to them.


Making Your Aircraft Take Off

  1. Create your aircraft as above tutorial, but renamed as (xxxxtakingoff or what ever).
     
  2. Reverse the above procedure by placing your aircraft at the "Centre Axis" first.
     
  3. In "Animate Part" click "Set Motion" then move the "Frame Button" to 420. Move the aircraft about 420 meters along the grid axis and press "Set Motion".
     
  4. Move the "Frame Button" to 2000, then move your aircraft up to about 300 to 400 meters and along to about 2000 meters. Finally press "Set Motion".
     
  5. Make sure everything is working as planned by moving the Frame Button from 0 to 2000 and back and watching the Aircraft.
     
  6. If everything is to plan, make sure your "Short Name" is what you want it to be in Project Properties then Save out and Create TS Object File.


Making An Aircraft Fly From A To B At A Specific Height

Making your aircraft fly over (from A to B) is very simple.

  1. Prepare your aircraft to the flying stage, making sure your aircraft is named (xxxFlyover or what ever).
     
  2. Open "Animate Part" and place the "Frame button" at "0" moving your aircraft to about -1000 meters by 300 to 400 high; press the "Set Motion" when you're satisfied.
     
  3. Move the "Frame Button" to 2000 and then move your aircraft to 1000 meters by 300 to 400 meters, then press the "Set Motion" button.
     
  4. Save out, Create TS Object File and view it in Shape Viewer. Test it by clicking Animation: with the flyover, your Base Arrow will be in the middle of the Flight Path.

You will very likely have to change a few of the numbers in the animation in the bottom of the "S" file to get the correct speeds: be careful here as you can ruin all your work so back up your "S" file first.


Animations For An Aircraft Landing In The "S" File

Red indicates the number of frames that you inserted in your animations: this can be edited by increasing or decreasing the number, the larger the number the longer the aircraft is in flight and the smaller the number the quicker the flight. If the 2000 in animations is changed also the 2000 in the Linear_key must be changed.

Brown indicates the height of the aircraft; the two low numbers indicate that the aircraft is on the runway, the 408.828 is the height at the start of the aircraft's descent: this can be edited to change the angle of approach.

The highlighted colours are the distances. The yellow is the distance in meters the aircraft will travel; the green is where the aircraft touches down on the runway; the blue is the final stop. All these values can be edited.

If the aircraft is moving too fast on the runway after landing, edit the green highlight by increasing the number say to 400.

Finally, the black 30 in animation: reducing the number slows the aircraft and increasing the number speeds the aircraft up; this is handy for final adjustments.


Animations For An Aircraft Taking off in the "S" file

It's basically the same as the landing animation, except in reverse and the editing is the same with the same colours.


Animations For An Aircraft Flyover In the "S" File

The height at brown is the same throughout the flight. The flight height is usually lower for the flyover: it can be even lower than shown.

yellow is the distance in meters either side of the Centre Axis: this can be edited for height and distance. Speed can be altered with the red frames or the black 30.


Summary And Conclusion

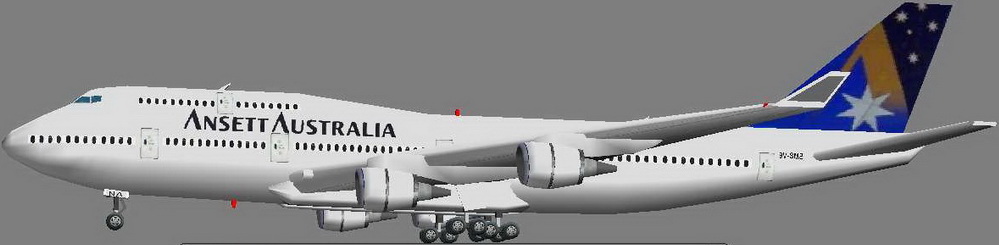
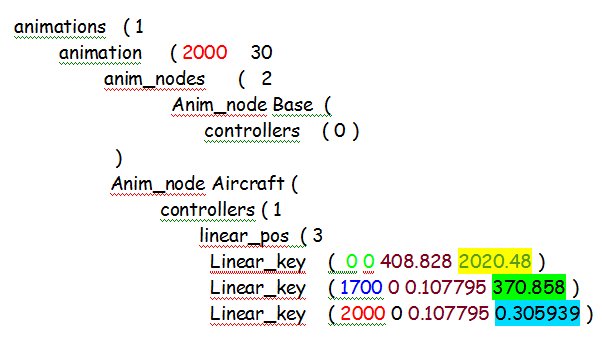
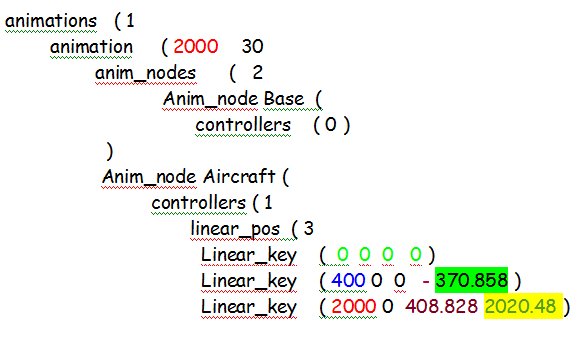
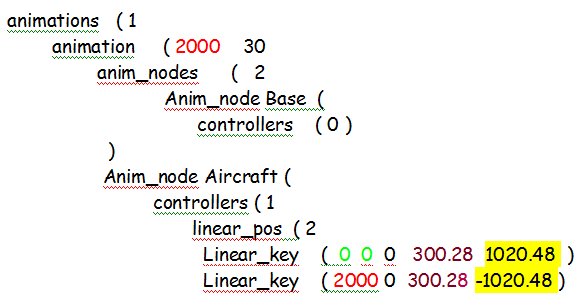
I have given you a rough idea of how to animate an aircraft so that it can be seen flying in the MSTS whilst you are driving a train. All these numbers are approximate as the 2000 frames can be 1000 or even 500: it's how far or fast you want your aircraft to fly. I have given you the near specifications for a Boeing 747; smaller aircraft would have less frames, lower height and lower speed.

I have seen an acrobatic Cessna in MSTS that would make a FA-18 red with shame for speed.

Final adjustments must be performed in the Route Editor. Right-click the RE workspace whilst the aircraft is in Wire frame mode (W key on the Keyboard and in the Properties General(cont), tick the "Animate this Object"; then you can adjust animations' values. It's then a process of exiting the Route Editor, adjusting and then saving the "S" file, and then drop back into the RE to note your aircraft's animation.

I will admit you might think it's all a bit hit and miss as the aircraft can only do as you direct it to do, but once you have studied the Animations in the "S" file against this tutorial you should have a reasonable flying aircraft of your own.

One "feature" in MSTS that I must warn you about is that all animations start at the same time, so that if you have a number of aircraft leaving a runway, they will all leave at the same time when MSTS is reloaded. You can vary this by making one animation slower than the other so that it gets left behind but it will eventually catch up.

Don't forget that the maximum distance seen in MSTS is 2000 meters.

You can download any of my animated aircraft from www.uktrainsim.com or my download page at ukts and use their animations if you wish.

Finally, building and flying your aircraft is your responsibility and no blame will be accepted by the author if it flies off into the blue yonder!