

A Coach Made With GMax
by Richard Osborne
Chapter 1: Overview
Introduction
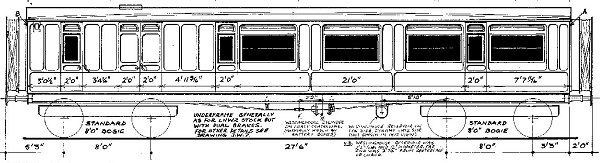
I don't even have a decent photo of the coach we're going to build, this is one of the plans I'll be using. It's a fairly typical coach from the late 19th century.
It's 2 years since I uploaded the TSM loco tutorial. I hope that it's been of use in this fascinating hobby of ours; I should have updated it by now, shouldn't I? Many thanks to those people who have sent emails to me. I know I made the point to start with something simple then make things more complicated - the same applies to Gmax.
Sadly Abacus still haven't upgraded TSM so that it lags behind the other 3d programs. 3dCanvas just won't work on my computer so I've learned Gmax; notice I say learned, I haven't mastered the program or really more than scratched the surface. I'm going to describe a way of building similar to TSM - it won't be the best method or will it use the program as the authors really intended but it works! Gmax has a reputation as being extremely difficult to learn & use; I'm going to show that it's really quite a kitten of a program. It only bites back if you scratch the wrong parts!<.p>
Gmax is a very powerful tool & is used by flightsim & games designers. It does have a very steep learning curve, however our needs are really quite simple; 95% of the program can be ignored & we still have the texturing & animation tools which make Gmax so much better than TSM. If we build in the same manner as with TSM, largely using primitives, very few new techniques have to be learnt. My interest is still with steam railways where the stock tends to have regular shapes. If you want to build newer, more bulbous stock then learn spline building techniques from the flightsim sites & Gmax wins hands-down.
There are still very few tutorials specifically for MSTS; there are many on the flightsim & car simulator sites. The flightsim tutorials are for Gmax, the car sites tend to be for high-end programs but much of what they contain gives useful hints & ideas. Note that texturing for regular Gmax & trainsim Gmax are very different. Gmax is very powerful in its graphics handling but you must take precautions which aren't quite logical. Certainly it was getting to grips with texturing which gave me my initial headaches. Please read as many tutorials as you can find, especially Volker Bollig's diesel loco & the .doc file in the gamepack. As usual tutorials make more sense when you've tried something for yourself.
Loading Gmax isn't straightforward - I don't know why; the program's free but you can't just load it & away. For MSTS you need to download Gmax itself, version 1.2, and the gamepack from Microsoft. URLs for these have been published at train-sim.com & uktrainsim.com. Load Gmax onto your computer, decide which drive you'll use - transferring it to another drive will mean re-registration! Load the gamepack; it's a self-extracting file. Now - the strange bit. The first time you try to use it it'll ask you to go online & register. Some people have trouble getting a reply - try again, perhaps the site shuts down out of office hours. You'll get an email within a short time with the longest code imaginable. Transfer it to the clipboard & then to the registration screen. For MSTS you need to start from the gamepack - it's easiest to bring the icon to the desktop. The screen should have 'Train Simulator' on the top toolbar.
For the TSM loco tutorial I used an 0-4-0 which doesn't have bogies & the associated hierarchy. For this tutorial I'll be building a bogie coach, I'll also be making much more use of transparent parts to cut down the polygon count as much as possible. The 0-4-0 could probably be trimmed by about 1000 polys without any visual difference by using transparent parts.
Gmax handles transparent & semi-transparent parts far better than TSM, although a partial fix is now available. Using Gmax you can see scenery the other side of a coach - with TSM you can only see the background. This is quite simple in Gmax; I've found it's only necessary to specify 3 texture states to achieve this. Gmax also allows carriages to appear lit at night & allows specular lighting - surfaces appear clean & shiny. Even using these textures I've only used 5 states - I have no idea how many could be used. There are other areas where Gmax is better; textures can be at any angle on the file - possibly more useful for aircraft but it makes for more efficient use of space. 1024 * 1024 texture files can be used; for this tutorial I'll use a file which will have textures for 2 coaches. As the coaches would run together in the same train this actually saves computer power. Levels of Detail are easy to achieve; this is having a composite where a less detailed model is shown when the image is small on the screen, this again saves computer power & allows faster frame rates.