How To Animate An Electric Loco (And Make Parts Move Using The P Key): Section 5
A Side Dump Gondola
by Paul DeVerter

A Port City Car Co. Project Copyright © 2005

SECTION 5A - A Side Dump Gondola

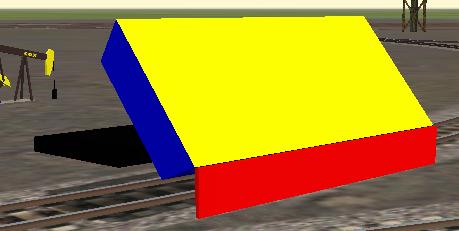
This Side Dump Gondola is somewhat more complex than what we have done heretofore. This Gondola has a hopper or gondola body that moves to the side, and then rotates to about a 45° angle, so as to dump the contents onto the Right of Way. This time we will use only two parts, which are arranged to work somewhat differently. The Main portion is the same as usual. The side dump hopper is made so that it will slide to the side, and then it will rotate and allow the contents to slide or dump onto the right of way. So, we will have a somewhat lower Main part, and then a hopper or gondola body that will move in accordance with instructions from the animation of the P key. This time we have only one animated part, but it will both move linearly and then it will rotate.

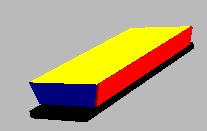
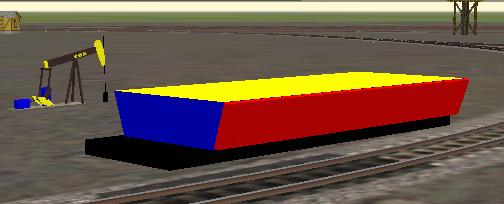
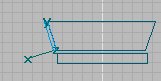
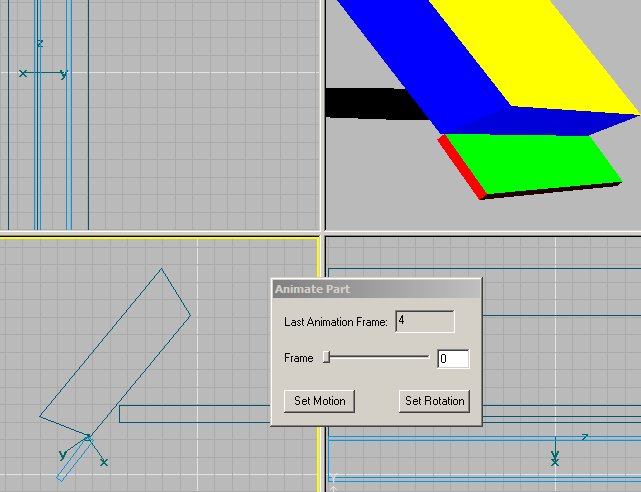
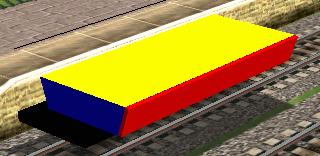
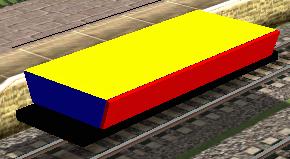
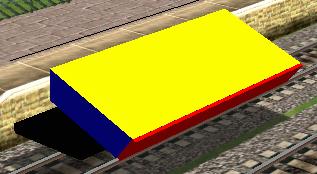
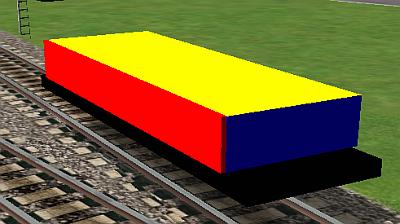
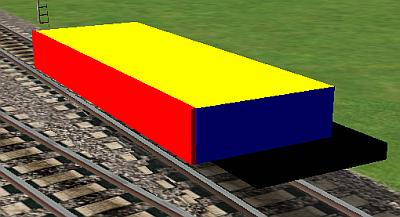
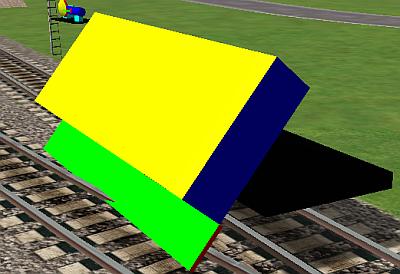
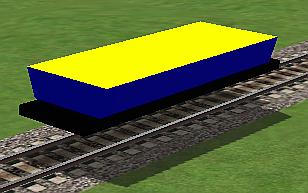
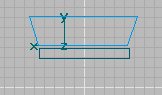
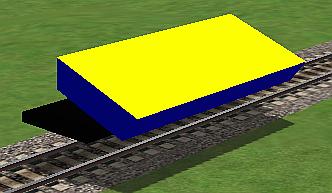
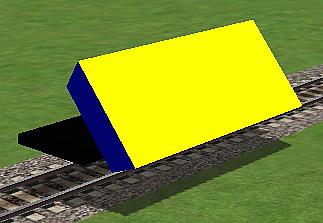
And here is what the Side Dump Car looks like, in running position:

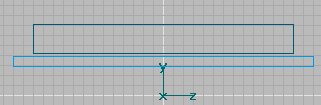
This time the parts are a little different, so let's start from scratch. First make a body which we will call Main sort of in the shape of a flat car. I have colored it black and raised it off of the track or Origin. By now you know how to make these adjustments:

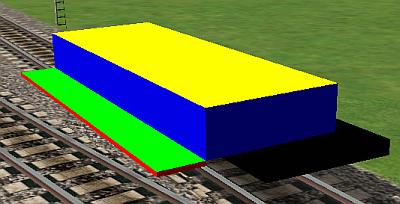
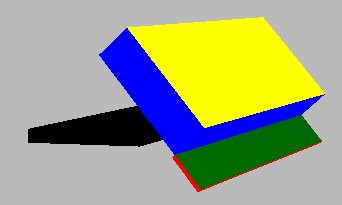
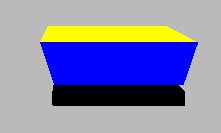
Then the next thing we need is a gondola or hopper portion which is also a simple box shape. To make it look more like a gondola you will need to decrease the size of the bottom portion. Below is an image of the textured hopper and an end view of the TSM file. Note that the origin of this part has been moved to the bottom of the hopper. It has also been moved to the side, about where I expect the rotation of the gondola portion to be rotated. I textured it blue on the four sides, yellow on the top, and green on the bottom. This was so I could easily see the various sides of the portion.

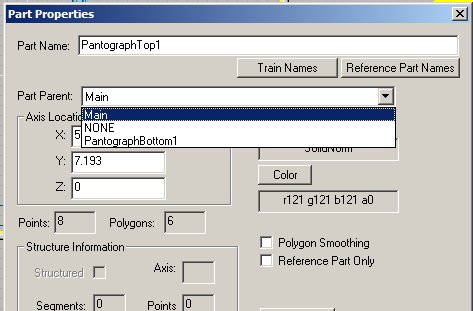
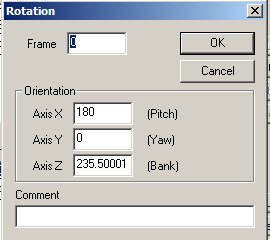
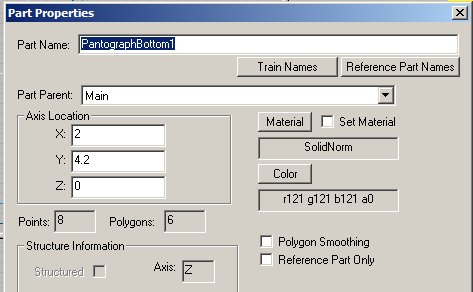
Now we need to think about the animation. As usual we first need to attend to some housekeeping, namely make certain that we have properly named the parts, inserted the proper parentage, and used the proper parentage. Press F2 for the frame and make sure you have named it Main. Then move to the hopper body or portion, and again press F2. Now look at the Part Properties window. We need for the Part Name to be one of those utilized by the "P" key, and that means it must be a Train Name beginning with the Pantograph prefix. I have again chosen PantographBottom1. And for this part I have made the Part Parent: Main. These are the only 2 parts for this Object.

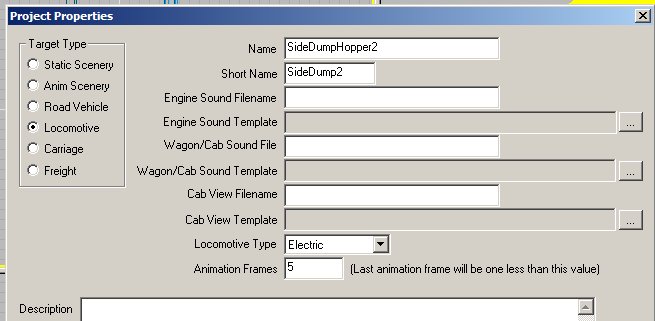
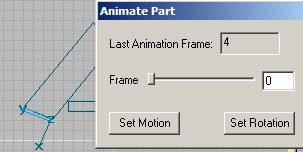
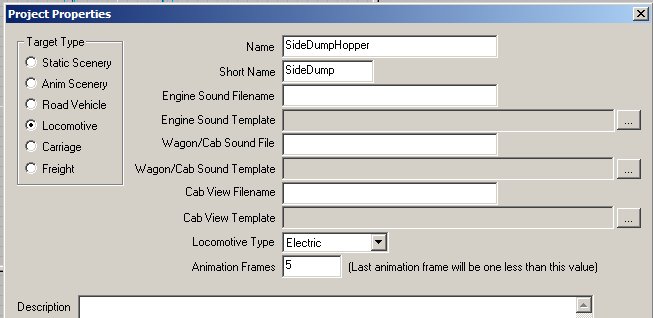
Now we need to go to Project Properties and chose Locomotive, Electric, and the number of animation frames, just as we have with the earlier objects. I have chosen 5 Frames for this gondola. Also pick a long and short name for your creation.

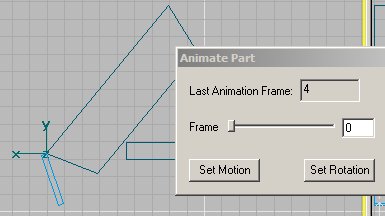
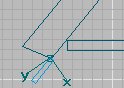
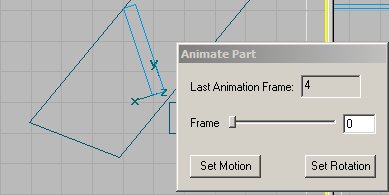
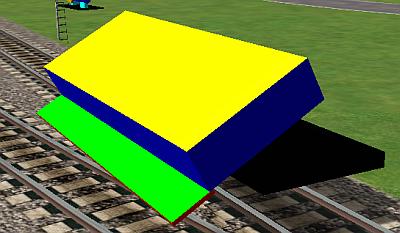
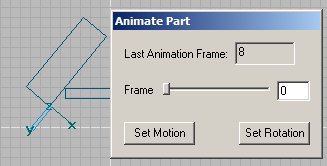
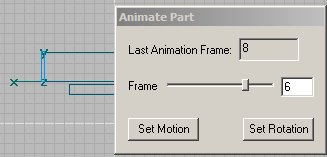
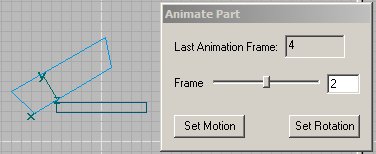
Next up is programming in the animation. We have learned that the first frame of animation should be the extended or non-running position of our objects, and the last frame should be the running position. We will want the running position to be with the gondola portion to be flat on the Main frame, so that means that Frame 0 should be the extended position where the gondola body is tilted in dumping position. Select the gondola portion and then push the "Ani" button. Then, using the Move Tool, move the gondola portion to the side so that the portion is beyond the Main, and then use the Rotate Tool to pivot the gondola portion so that it is at about a 45° angle to the Main. This will be the starting position or Frame 0. Once you have it in position push both the Set Motion and the Set Rotation buttons. Now you may move on to the next point where something happens.

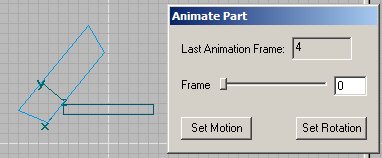
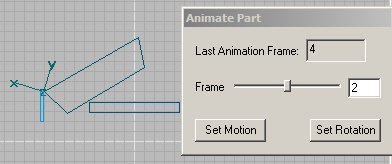
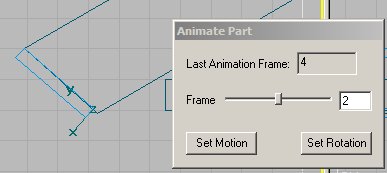
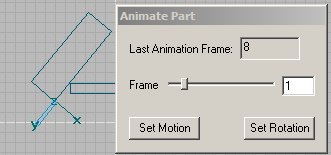
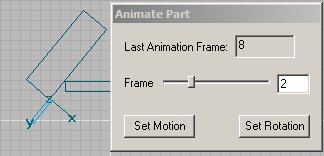
Let's move on to Frame 2, and let Frame 1 alone, as it will be automatically interpolated. Move the slider to Frame 2, and rotate the gondola portion as shown. Then push the Set Motion and the Set Rotation buttons once more. Actually, you probably only need to press the Set Rotation button, since nothing is happening to the linear motion.

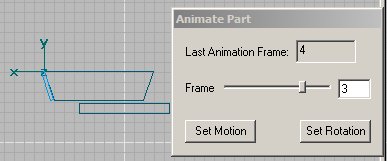
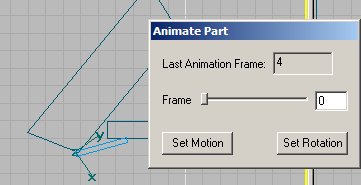
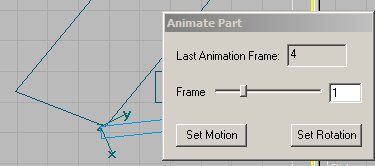
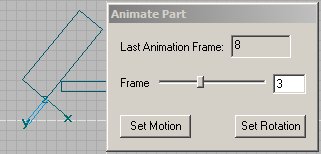
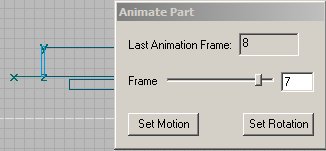
Indeed you may have been able to omit even programming Frame 2, and simply gone from Frame 0 to Frame 3, because it would all be interpolated. Well, let's move on to Frame 3. Again make the necessary rotation of the gondola portion, this time to the horizontal position. Now press Set Rotation again and also Set Motion, because this is the beginning of the next phase - namely the sliding of the gondola portion from off the side to the center.

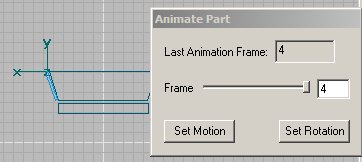
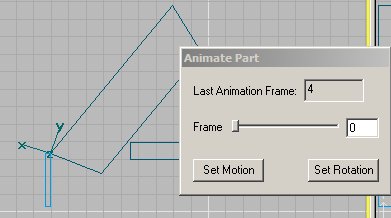
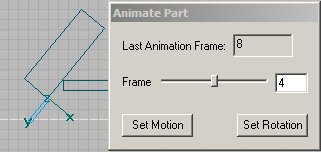
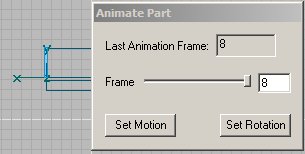
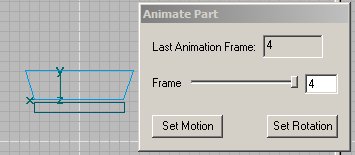
Finally move the slider to Frame 4, and then move the gondola portion to the center. Press both the Set Motion and the Set Rotation buttons and we are done with the animation. You probably do not need to press the Set Rotation button, as we are only linearly sliding the gondola portion

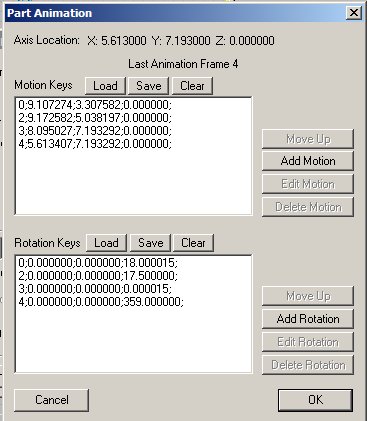
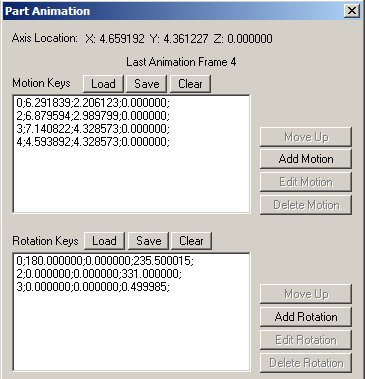
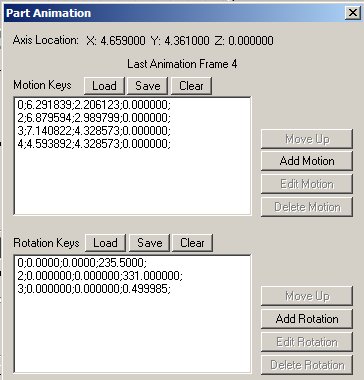
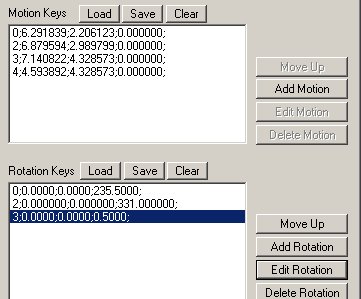
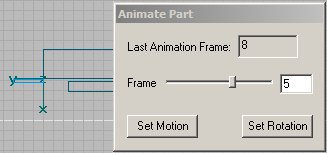
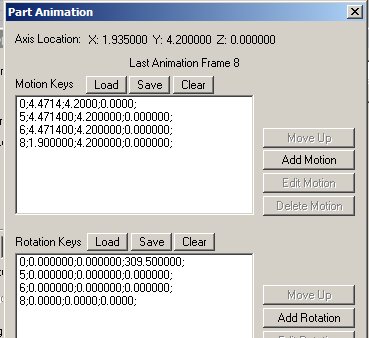
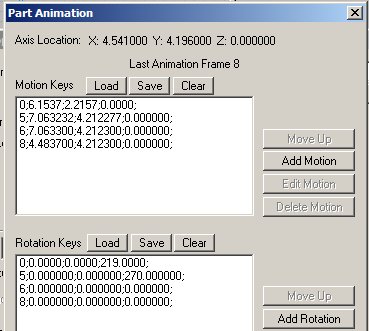
OK let's check out the animation. First move the slider back and forth and see if things look pretty good. Then check out the actual animation keys. You will remember that the procedure is to return the slider to the left, or Frame 0, and then get out of the Animation sequence. Make sure the gondola portion is still selected. Next press F2 and then the Animation button at the bottom right. This will bring up the Part Animation window, which will show what we have done, and whether anything has gone bad.

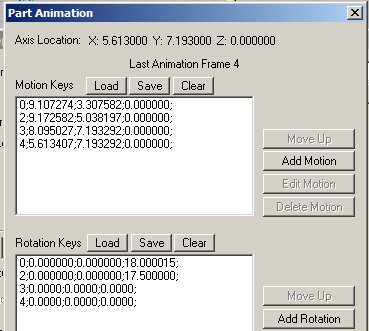
Looking at the Motion Keys we see that Frames 0 through 3 are identical. This is as it should be, since all that is happening in these Frames is rotation.

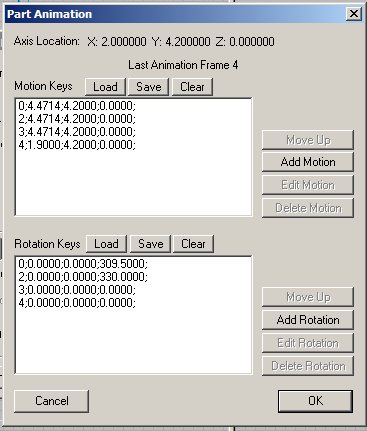
The only Motion occurs between Frames 3 and 4, when the gondola portion slides over from the edge to the center. Looks good so now look at the Rotation Keys. Here we see rotation taking place from Frames 0 through 3, and none between Frames 3 and 4. Again, this is what we programmed, so it looks fine.

Since we have already textured the two parts, and the animation looks good proceed to Create the Train Simulator Object. The steps are identical to those previously done with the other locomotives in this series except for the Filename. Make sure all the boxes are checked in Processing Options and click Continue. Make a consist using Consist Editor, for your SideDump Electric Locomotive and then head for the Sim and take a look at the finished project.

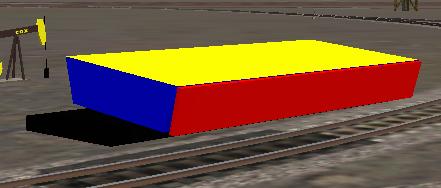
When you open the Sim, you will see the SideDump moving from the dumping position (Frame 0) to the running position (Frame 4). This is because the default line in the eng file reads:

PantographToggle1 ( 0 1 1 )

which means that the Pantograph is to move to the running position (remember the last item in the brackets is a 1, which tells the SideDump loco to move to the end of the sequence of frames of animation). Now release your brakes, and advance the throttle, and off you will go.

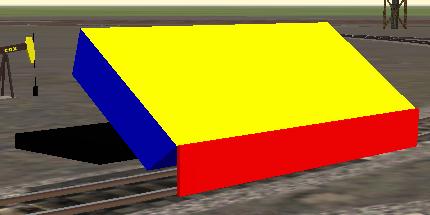
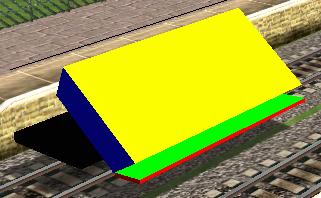
When you get to a convenient location, set the brakes and press the "P" key, and you should see the following sequence of animation.


Lessons Learned

You have now learned how to animate a single part, and have it successively rotate, and then move linearly. And you should be able to add to the number of animation Frames, in order to slow the movements down, and likewise to add more time to either the rotation or the linear motion, as you might desire.

Now it is time to move on to an even more complicated version of the Side Dump Gondola, this time adding a Side Door that opens.


SECTION 5B - A Side Dump Gondola with Top Pivoting Door

Let's move on to an enhancement of the original Side Dump Gondola. We are going to add a door to the side just as on the prototypes, which door will be used to hold the material in the gondola portion until the portion has moved to the side, and then the door will be unlocked, and rotate to allow the material in the gondola portion to slide out of the gondola as the portion is tilted. This will require us to add another part to this mock-up, namely a top pivoting side door. So far as animation is concerned we will be adding a new part that both rotates and moves linearly as the gondola portion is moved. We will be adding the red door, as seen in this photo:

Undoubtedly the easiest way to make this addition is to simply copy the original SideDump Loco and give it a new name. Proceed to add the additional part and animation as needed. Let's do that. If you called your original TSM project SideDumpHopper.dst, then open that file, and Save As SideDumpHopper2.dst. This will close your original file and the current project will use the saved as name.

We can leave the animation alone and proceed by using the Box Tool to make a further part, namely the Side Door. Measure and duplicate the depth and height of the gondola portion and for the width choose 4 or 5 inches, say 0.4. You may texture all six sides of the Door now: I used red. Then you will need to move it up to the side of the gondola portion, so, use the Move Tool, constrain z, and do the necessary.

It will then need to be rotated using the Rotate Tool so that it fits snuggly against the side of the gondola portion. Once you have done that the next step is to adjust the origin of the door.

Normally the origin is in the middle of the door, and it needs to be moved to the top and to the side of the door that is adjacent the top side of the gondola.

The origin of the door now becomes the pivot point for the door. You do this by selecting the door, then holding down the SHIFT key, and using the mouse to move the origin axes to the upper part of the door immediately adjacent the gondola portion.

Once this has been done it is time for some more housekeeping. Recall that the original number of frames for the SideDump loco was 5, and so will this be as well, since it is a mere copy. We will need to change the long and short names of the loco in the Part Properties pane. Here I have changed it to SideDump2 for the short name.

We will need to change the Train Name of the Door from box to one recognized by the "P" Key. We previously used PantographBottom1 for the gondola portion so let's use PantographTop1 for the Door. Then we will need to set the Part Parent for the Door to Main. See the photo below for my choices.

Now we are ready to begin the additional animation for the Door. First make sure you have selected the Door, and then go to the top of the dst file, and push the "Ani" button. This will bring up the frame showing the animation of the gondola in the background. You will see that we are at Frame 0 of 4 Frames, and the gondola portion will be extended out and tilted. We will need to move the Door to its proper place adjacent the gondola. You will want the Door to be open, and I have chosen a vertical position for the Door as being open. Make the necessary adjustments using the Move and Rotate Tools so that your Door looks like this, in Frame 0:

When you are happy with the position, press the Set Motion and the Set Rotation buttons. Then move the slider over to Frame 1. Now recall that we had not pressed either button for Frame 1 when we did the gondola portion. Likewise, you need do nothing with respect to Frame 1 of the Door. Using the slider skip on over to the next Frame, which will be Frame 2, and here is what you see:

Now the gondola has begun to rotate more toward the horizontal. You will need to use the Move and Rotate Tools to adjust the position of the Door so that it is still at the upper part of the gondola and is also still hanging vertically. Once this is done, then push both the Set Motion and the Set Rotation buttons once more. We are done with Frame 2. Next is Frame 3. At this point the gondola is horizontal, but hanging over the edge of the car body, or Main. So, we need to again adjust and move the Door, so that it is still adjacent the top edge of the gondola, and is also closed against the body of the gondola.

Once there, again press the Set Motion and Set Rotation Buttons to fix the animation. Now it is time for the last frame, Frame 4. Once again move the slider over so that you are in Frame 4. Now move the Door over so that it is against the gondola and

press the Set Motion button. You do not need to press the Set Rotation button, since there is no change in rotation of the Door between Frames 3 and 4. However, I did press both buttons, so I can illustrate another point in a moment.

This should complete the animation of the Door with respect to the Gondola. However, I found that the Door did not always want to cooperate, and as I moved the slider back and forth, strange things would happen, particularly at Frame 0. As you can see, the door was no longer hanging vertically. You need to make it behave.

In this instance I simply used the Rotate Tool with the z axis constrained and reset the door back to a vertical position. This was all it took for this door. But run the slider back and forth several times to make sure all is well.

Also take a look at the Part Animation window for the door, which you will recall you access by pressing F2, and then the Animation Button at the bottom. As to the Motion Keys you should see nothing in the z axis. And the only Motion change between Frames 3 and 4 should be in the x axis, because the Door is simply moving horizontally. So Motion Key 3y and Motion Key 4y should be the same.

In the Rotation Keys you will see that the Door is rotating slightly in the z axis between Frames 0 and 2. Then once the Door reaches Frame 3, there is no further rotation, so Frames 3 and 4 should be the same. As you can see they are not, as there is slight noise in the z axis of Frame 3 and likewise in Frame 4. Well, you know that 0 is 0, and 0.000015 is practically 0, and likewise 359 is practically 360 and 0 = 360° in a circle, so edit the Part Animation Rotation Keys in Frames 3 and 4 so that both have 0° in the z axis. They will then look like the following photo:

We are done with the animation and the texturing so make sure you have Part Parent of Main for both pantograph parts and proper Train Names for them. Make sure you have picked a new name for this Object, such as SideDump2. Then Create the Train Simulator Object just as you did for the Rail Gun and Linecars.

Open the Consist Editor, and make a new consist for this Side Dump Gondola with the top pivoting door, and here is what you should see:


Lessons Learned

We have now learned how to make an animated Electric Locomotive object that has two parts that both move linearly and both rotate, at different rates. We have also found that animated parts do not always behave, and that we must learn to look carefully at the Part Animation window for clues on how to fix them. We have also seen that carrying numbers out to 5 or 6 decimal points really does not matter, and the Part Animation numbers can be rounded off without detrimental effects.

Now we will move on to a further variation of the Side Dump Gondola.


SECTION 5C - A Side Dump Gondola with Bottom Pivoting Door

Instead of having a door pivot from the top, let's make the door pivot from the bottom. When the Differential Car Company first made its Traversing Tilting Body Cars, the doors pivoted from the top just as in the design we have already finished. But it later began to make the same cars with the door pivoted at the bottom. I do not have all of the Difco bulletins, but the change occurred between Bulletin D 4 (undated) and D-14 (1925). Later came the Air Dump cars, Bulletin D-28 (undated). The earlier model were electrically operated, because the Side Dump Gondolas were marketed first to the street railways and interurban companies. Later they were arranged to be air operated for use by the steam roads as well. By arranging the door pivot to be at the bottom, the material being dumped was placed further from the track.

The movements of the gondola portion and door will be pretty much the same as before, and again the easiest way to proceed would be to simply copy the SideDump2 Loco, change the name to SideDump3, and make a few changes in the parts. That is exactly what I did for starters. And I had nothing but trouble in the animation. Anyway, here is what we are seeking to accomplish.

The difference here is that the pivot for the door is at the bottom, and I have painted the inside of the door green, while the remainder remains red. OK, open up SideDump2, and save as SideDump3. Then make sure you change all the names in Part Properties to reflect the new name. For the moment leave the animation frames as 4.

Now go to the door and look at it in the front view. The first thing to do is to move the axes from the top adjacent the top of the gondola portion to the bottom, likewise against the gondola portion.

You should be an expert in moving the axes around, but if you have forgotten, use the Move Tool, constrain the z axis, and hold down SHIFT while using the mouse to shift the origin. Now you can either overwrite the Part Animation for the door by pressing the Set Rotation and Set Motion buttons, or you can go to Part Animation for the door and clear the Motion and Rotation Keys, your choice. I think the latter is a little cleaner. You may leave the animation for the gondola portion just as it was for the SideDump2 loco.

You are now ready to animate so select the door, and push the "Ani" button in the menu across the top. This will move the gondola portion to the full tilted position, and require you to move the door to the proper position and rotation, so that the axes of the door are at the bottom of the gondola. Here we see it in place, but not open, and so after you have placed the door, with the Move Tool, next use the Rotate Tool to open the door so that it is parallel with the bottom of the gondola portion.

Once you have it there, press both the Set Motion and Set Rotation buttons.

Next step is to move to Frame 2 just as we did with SideDump2, and again put the door into position. And just as soon as I did so, and went back to Frame 0, here is what I saw.

I started over again and got to this point in Frame 2.

Then I went back to Frame 0, and another mess.

It didn't seem to matter what I did, the door had a mind of its own. I decided to check the Part Animation, and this is what I found. Look at Frame 0 Rotation Key, and

you will see the x axis has a 180 for openers. This should be a 0. I tried editing this line by using the Edit Rotation button and changing the 180 to 0.

Well, the long and short was that I never could get it to behave. So, in desperation, I deleted the door, and started over with a new door. And to help me see what was going on, I textured the inside of the new door green, and made the outside red. This seemed to help, or I wouldn't be writing this tutorial. Maybe there is some mysterious dark force that convinces the animation to follow its own path, and not behave, as it should. In any event, I figured the green might help point the way out of the puzzle.

And it did help, and after only a few misadventures, I got the door to do what I wanted it to do. Every time the mysterious 180 would show up, I would change it to 0. I also remembered that when things went wrong with the Stationary Steam Engine tutorial, I recommended saving after each step. So, I did that as well. That is, animate Frame 0, and then save. Then animate Frame 2 and save again, etc.

You may ask - why are you boring me with details of failed animations? The answer is that there is a tremendous learning curve in animation and the only way to win is to try and try again. What we did should have worked, and it did not. You need to know that things often do not go right, and if you expect that, you will be prepared to keep trying and experimenting.

I won't bore you with the step-by-step, but animation is still mostly a black art, to my mind. In any event, this is what the final, and actually working Part Animation looks like for the door. There are several things to notice. There are no entries in the z axis of the Motion Keys. There is no difference between the y axis Keys in Frames 3 and 4. This is because the door is merely sliding over with the gondola, and the motion in those two Frames is only in the x axis. Finally we ended up with a long fraction in the z axis of Frame 3 of the Rotation Keys.

I did not use the Set Rotation button in Frame 4 because there is no rotation change in the door between Frames 3 and 4.

I edited the Rotation Keys, Frame 3 to reduce the long fraction to a smaller one.


It is now time to Create the Train Simulator Object, and see what you have. With any luck it will look like the photos above. And all with only 4 Frames.

Lessons Learned

You have learned to make two animated parts, both of which move linearly together, and then both rotate at different speeds. But you have also faced the frustration of not being able to predict exactly what the animation is going to do. You have thus learned to try and try again until you beat the Object into submission.


SECTION 5D - A Slow Side Dump Gondola With Bottom Pivoting Door

I intended to end this tutorial here but I wanted to see if I could slow down the sequence by simply changing the number of Frames; you will recall that is perfectly possible. I also decided to re-read the Difco Bulletins, and found that I did not have the animation quite correct. Difco made the gondola portion slide out, and then opened the door. After the door was opened, both the gondola and door began their tilting motion, to dump the materials on the ground. One reason for this approach was so that workmen, who were loading the gondola with shovels from the ground, did not have to lift the material over the top of the door, because it was opened and thus lower. The other was to make certain the material being dumped was placed further from the track, and this was accomplished by having the door act as an extension of the bottom of the gondola.

I started in again using the same Main as before but changing to a square sided gondola (as opposed to tapered) and doubling the number of frames to 8. I am not going to go through the construction and numerous problems. Instead I am simply going to show you the Part Animation windows and make a few comments on the scheme of things. Hopefully this will give you some insight into how these things work.

First let's look at the sequence of photos which show the SideDump4 starting in the running position, then slide out, then door opening, tilting, and finally fully tilted.


We need to plan how we are going to accomplish this in the space of 8 Frames. If we assume that the movement from door closed to door open will take one Frame, then how many do we need for the sliding motion and how many for the rotating motion? And we do not want the tilting or rotation to take place until the door is fully open. What I did was decide that from full tilt to horizontal would take 4 or 5 frames, the door closing 1 frame, and then two to slide over the center - now thinking backwardly, but in line with the animation steps. Remember the animation Frame 0 is at the opposite end of the running position, so you must read the photos from right to left. I found that you need a Frame where nothing is happening, or the Sim interpolates continuing motion, and wants to smooth everything out. This will result in the door being separated from the gondola in the Sim, even though they are adjacent in the TSM animation frames.

It is possible to set or fix each animation frame even in the middle of rotation of the gondola and door. But if you let the Sim interpolate the movement, it is not as jerky, and does not speed up and slow down if you do not get the rotation exactly correct.

Now let's look at the individual frames as shown in TSM. Let's begin with the frames at the end where the loco is not running and the gondola is extended, namely Frame 0 and work our way to Frame 8. OK, here is Frame 0.

Now we follow with all the frames through Frame 8.


Now what do you see? Well, you see that it appears there is no movement in the gondola from Frames 0 through Frame 4. You can see that the door is parallel to the bottom of the gondola from Frames 0 through 4, and then in Frame 5 the gondola has rotated, but the door remains parallel to the floor of the gondola. Then in Frame 6 the gondola remains the same as Frame 5, but the door has rotated 90°. Next, Frame 7 seems the same as Frame 6, and finally, in Frame 8, the whole gondola and door have moved to the right to be centered on the Main part.

Perhaps we should look at the gondola Part Animation, and see what it tells us.

It tells us that the impression we got from looking at the Frames is wrong. Look for a moment at the Motion Keys. What we see is that the gondola has not moved from Frames 0 through 6. Then the gondola moves between Frames 6 and 8. Frame 6 in Motion is the same as 5. Interesting. Likewise look at the Rotation, and you will see no rotation between Frames 5 and 8, and only rotation is between Frames 0 and 5.

I think the lesson here is that Motion means movement other than rotation, and if we look back at Frames 0-6 there has been no motion, only rotation. Indeed it even looks like there has been no Motion even into Frame 7. But that is not true either, which you can see if you Create the Train Sim Object and observe closely what happens.

Now let's look at the Part Animation of the door. It too is telling. There is Motion between Frames 0 and 5, 6 is slightly different from 5 and then there is x motion between 6 and 8. As to Rotation, the only apparent rotation is in the z axis, and that is between Frames 0 and 5, and then another movement between Frames 5 and 6. Well, in Frame 5 of Rotation, the z axis number is 270, and you will remember from your trig class, that 270° is the same as 9 o'clock. Then in Frame 6 we see 0°, which is the same as 12 o'clock. This is exactly what we programmed. The door moves from 9 o'clock to 12 o'clock, and does not rotate further as the door moves to Frame 8.

I do know that the door and gondola did not stay together as they moved from Frame 0 to Frame 6, until I added Frame 5 - which acts as the end of the sequence where the door and gondola move together. I also lwanted the door to complete its rotation from 270 to 0 before the whole thing began to slide toward the center. This is anchored by Frame 6, and completed in Frame 8.

Lessons Learned

I believe you must have starting and stopping points for any coordinated movements, whether Motion or Rotation or both. But an awful lot is based on intuition and trial and error. I'll think on it some more, and maybe it will somehow become clear.

Now on to Section 6, and an even more complicated object.