Constructing A Steam Loco Using Train Sim Modeler - Part 1
by Richard Osborne

Overview

Let me start by saying I'm not a programmer, expert or guru to the masses; just somebody who's drawn & animated models in Train Sim Modeler (herein after referred to as TSM). Other people won't agree with this way of building - to each his own. TSM seems to be able to cope with all manner of styles. This second version of this chapter incorporates editorial amendments & suggestions from Mike Wilson, a fellow Southern Railway enthusiast who practices his arts on the other side of the World.

I'm going to assume you're totally new to TSM, more experienced people can always skip parts.

I came to TSM after becoming familiar with its elder brother Flight Shop Design Studio; since I started using flight sim programs I've adopted the habit of reading everything in the forums, even if only one sentence a page is relevant it's worth while. I've dropped into a routine of naming parts - you'll find loco parts with port & starboard attributes.

TSM has its limitations but is, like its big brother Flight Shop Design Shop, quite a simple program to use. You do need patience, perseverance & a bit of luck but it's no more difficult a program than, say, a Desktop Publishing program.

I use Paint Shop Pro for texturing; other programs can, of course, be used. I'm getting used to its quirky ways. Other people swear by PhotoShop, which often comes packaged with a scanner.

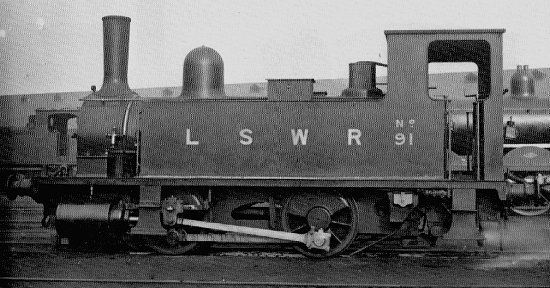
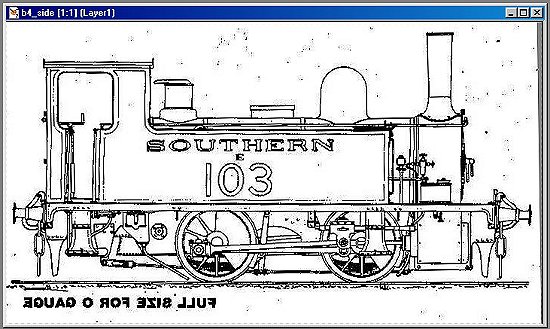
It's inevitable that people want to start with a locomotive when logic & the certain knowledge that every computer program has a steep learning curve tell you that you should start with a garden shed!

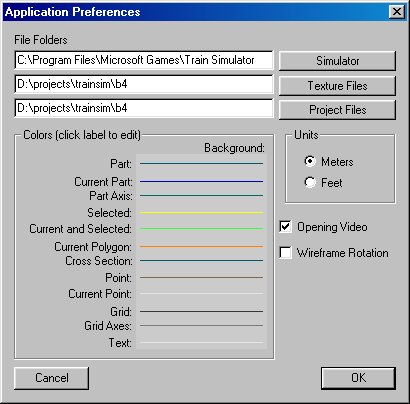
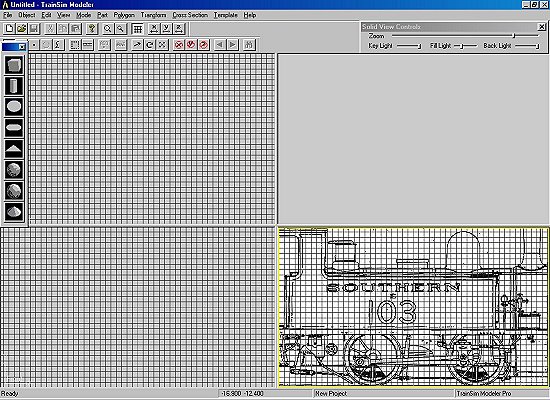
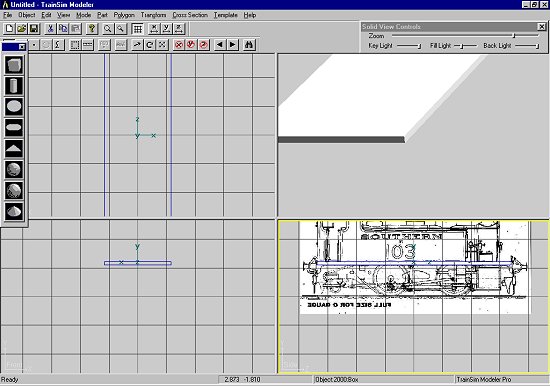
Could I suggest at this stage you load TSM, open one of the sample files & press & prod every button, menu & key - just to see what happens. Don't save the sample though! Read the Help Files! Please familiarise yourself with the 'Overview' chapter - print a hard copy for reference.


Plan Of Action


photo taken from LSWR Locomotives D L Bradley

I'm going to go through the progress of making a locomotive from scratch. This is a small loco; ALL of the techniques can then be used for building far more ambitious projects. Normally I'd use parts I've already made & used on other projects. This time I'll start with a blank screen. I'll start with a simple version then show how to make spoked wheels & more complicated gubbins.

My favourite railway company has always been the London & South Western. For my stable I need a tank engine. I've settled on the Adams B4 Class 0-4-0. Everyone likes a cute little tank engine, don't they? Its outside cylinder as well, I'll build it as an inside cylinder then add the cylinders & associated motion so that I can demonstrate animation.

Let's have a plan of action:-

    reference
  • before starting
  • TSM preferences
  • establish basic shapes
  • add big lumps
  • add detail
  • texturing
  • transparencies
  • exporting


References

I've quite a bit of LSWR reference. The B4 is one of the best known locomotives, there are a couple preserved.

Start with a decent .bmp plan with side & front views.

Be careful here - although it's tempting to use a large, detailed drawing the reduction process in TSM loses some of the benefits. The view will not be shown at extreme zoom ratios. A good, clear '00' plan scanned at 100dpi is perfectly adequate. A large background file will slow TSM considerably.

The side view must show the loco going left to right, opposite the normal. We've all been caught by this quirk. TSM insists on a .bmp, other file types can be converted in a paint program. Top view isn't so important for a loco, if a top view is available use it, it can be hidden at any time. The background view is one of the most useful tools in TSM. The earlier flight sim programs didn't have a view at all. You had to go through all manner of screen shots & convolutions. I'll demonstrate to establish the basic dimensions rather than rely exclusively on the views.

Print off a hard copy of your reference plan, it's not necessary but it is useful. It's better if your reference has a scale, you have to fix the scale. It's normally fairly easy to find driving wheel size, wheelbase, total length from books or the 'net.

If all else fails there are a few fixed dimensions. In Britain, buffer height is 3' 5" above rail level, buffers are 5' 9" apart, maximum height above rail level is 13' 4", footplates are 4' above rail level.

In PSP read off a known dimension, quite by coincidence the length of the footplate is 600 pixels. From another drawing I know the prototype length is 22' 2 1/4". No point being this exact 22.25ft will do. Using my calculator gives me 6.782m. By a similar process the width is 2.334m. Often even a small plan gives the most important dimensions:- wheelbase, overhang, boiler height, chimney height. Establish these dimensions first & stick to them!

It saves time and effort later if you're prepared to spend time with a ruler now and calculate other leading dimensions. Either mark up the plan, or knock up a quick spreadsheet for later reference. There will always be something that you need to measure, but the major design elements are worth doing beforehand. Again, there's no value in being too precise as dimensions - on motion parts particularly - vary with the life of the locomotive and the level of interest of the fitter. Much maintenance work was carried out on the principle of 'if it looks right, it probably is'.

Spend a while looking at the plan. If you can get a hold of a model, look and play with that. Look at photos as well - often the real thing differs markedly from the plan. Try to get a sense of the shapes that comprise the locomotive. Artists try to break everything down into component 'primitives' - spheres, cubes and disks etc. This is a very helpful approach to loco building. For example, the steam dome is basically a sphere interposed with a cylinder.


Before Starting

Give yourself somewhere safe to store your work. Get in the habit of saving work often, every 5 minutes or so. It takes a fraction of a second & can save your sanity which will, take it from me, be strained.

TSM takes a backup every 10 minutes, I don't think this can be made more frequent. You'll find a file called Autosave.dst in the root directory of TSM. At some time into your project open this file & take a look.

I split the hard disk into partitions. My data is all on d: drive, TSM itself is on H: drive.

On d: drive I have a directory named 'projects', this has subdirectories, flightsim, trainsim, turbocad, aircraft & dxf files. For this loco the directory will be d:\projects\trainsim\b4. Might have been called 3_lupins, it doesn't matter; all the current work is in one place. At least once a week I backup onto disk, I've lost work in the past. It hurts!


TSM Preferences

TSM will function perfectly well straight out of the box. It comes, however, with an unusable file which will make a nonsense of later operations so we'll delete it. In TSM\resources you'll see a file 'wheels.rot' at least I think it's called that; there's only one file with a .rot suffix. DUMP IT, we'll put something more sensible in its place later.

TSM will convert feet to metres but I find it just as simple to work in metres directly. Older drawings will show feet & inches. I grew up with feet & inches but find metric measurement far simpler. There are plenty of converters available on the 'net, there's one which allows you to read from a 4mm/foot drawing & convert it to feet. This sits on my toolbar ready for use whenever I'm drawing in TSM. All of the screen shots in these tutorials will show metres.

It's also possible, of course, to produce the entire project in Imperial units & scale it to 0.307 to convert it to metres - it's difficult to make changes though.

So, in 'Program Preferences' change the units to metres (actually meters - American program ). I don't much like the default colours so I changed them. This is a purely personal choice.


Establish Basic Shapes

We want the side view - bottom right - click & a yellow border will show. This is now the live window.

On the toolbar press 'View', on the dropdown you'll see 'Backdrop' & an arrow. Press on 'Backdrop' then 'Load'. Press 'Load' then find your side view. It'll look enormous. It is; we need to scale it.

The rest of the dropdown menu is now black & live. Press 'Scale', a complicated looking screen appears. Our previous little bit of maths is used here. In the distance window type 6.782, in the pixels window type 600. Press 'Apply' then 'OK'.


In TSM you zoom in & out with the 'i' for IN, 'o' for OUT keys. Panning isn't so straightforward, put the cursor where you want the centre to be; right-click & press 'center'. Now that the plan is just a dot in the middle of the screen press 'i' a couple of times so you can see what's happening.

We need to have something actually drawn before we can save a file. We know our footplate is a rectangle 6.782 * 2.334m, 1.219m above rail level. We'll draw that first.

You can see a toolbar for drawing primitives; box, cylinder, sphere, polygon etc. Press the 'box' button. We can draw a box & size it or, more simply, we can specify the size. Call it "footplate", type in the sizes we've already established. We'll have to remove most of the polygons later.

We need to flip our footplate - we really want the origin on top, not on the bottom. Find 'Transform' on the toolbar, then 'Flip Y'. The part will now be under the origin. NB, I came back to this part at Mike's suggestion - the original use of a polygon was a bit confusing. At some stage you'll have to remove all bar the top polygon. Remember to come back to it after you're a bit more familiar with the program.

On screen we can see our footplate, we can see our plan. Unless we're unusually lucky they won't be close to each other. TSM has a very sneaky & welcome feature. With the side window live press the 'Ctrl' key then the direction arrows. This moves the view centre & is a bit magic. Juggle the view until it's in the right place. It might help to highlight the part by pressing the space bar. Save the job again.

For some reason the background view isn't stable in TSM. Now that the footplate has been measured & fixed don't change it. If in future the view doesn't line up juggle the view not the model.

The file is still 'untitled', it's about time we saved it & the settings we've just established. Again it doesn't matter what we call it, somehow B4_1 seems appropriate.

I prefer to have many parts. You can used saved parts for future locos & you can isolate parts if there's a problem. Get in the habit of saving as you go. In 'part' mode; save your part. TSM is very obliging & saves with the name you've just given.

We haven't yet got a parent for our footplate. In theory we could have the footplate as the parent. In theory we could have a part called 27_lupins as a parent. We'll do something more sensible.


The "Main" Part

It seems that the parent part can have any name. Some people have it as "body", I've got into the habit of calling it "main". It's a good idea to draw a part now, subsequent parts can be glued straight to it. We won't have bogies so there won't be any problems with heirarchy.

The 'main' part will be used later for the frames. From the primitives toolbar choose 'Box', name it 'main' make it 2 * 2 * 2, 'origin at center'. You can now see 2 parts in the perspective window.

We'll use the 'scale' & 'move' buttons for this part. You'll see 3 buttons on the lower bar, an arrow for 'move', a circular arrow for 'rotate' & a cross for 'scale'. To the right of these are 3 more buttons which lock the 3 axes.

Lock the 'x' axis. Press the 'move' button, or press 'm', move the box up a bit. In the front window, press 'scale' then adjust the width your box by clicking & dragging. Make the width about half the width of the footplate.

In each view you can adjust 2 axes, whichever are right & up. Experiment. In 'side' view adjust the length to the footplate length. . Press F2 & in the 'Part parent' window press 'NONE'. Save the part.

IMPORTANT INFO: This is the only part which will have no parent part, in this loco everything else will have 'main' as its parent.

Press 'p', the footplate will be highlighted. Remember this part hasn't been given a parent, F2, 'Part Parent', 'main'. While you're there change the colour. Save, replace existing part. Might as well save the project at the same time. In TSM the 'save' button will grey out.

Before we make some wheels we'll do something which might seem odd. TSM, even on my creaky system, can be running twice. This can be very useful. Minimize the TSM which is open. Open another TSM, find TSM_anim060.dst in the TSM projects subdirectory. You'll see they've made the boiler the 'main' part. Cycle through the parts with 'p' or 'n' until you get to one of the wheels. We don't want the wheels, just the rotation.

F2, in the bottom right you'll see the 'Animation' button with "rotation" next to it. The 2 parts we've saved so far show "no animation". Press the animation button, you'll see a set of figures which is a regular geometric progression. Remember we deleted the .rot file in the 'Resources' subdirectory - we want it back. The rotation on these wheels work fine. Above the list press 'save' & save it, probably in the same directory. Give it a name you'll recognize. I'll suggest rotatex060.rot. When we've made the wheels we'll load the same file - saves having to work it out for ourselves.

TSM 1.1 has caused a great deal of confusion when animating. A little book keeping now will clear the way. In 'File' on the toolbar you'll find 'Project Properties'.

A screen will appear. On the left side press 'locomotive'; short name B4_1, long name B4_1, for the engine sounds browse for the default 'scotsman' folder, in the 'sounds' folder for 'gensteamwag.sms'. This will get us going; you can change them later in the .eng file. We want 'Locomotive Type' 'steam' & 'Animation Frames' '9', this links with the rotation file we've just saved. Until this screen is completed animation won't work.


Wheels

Now lets get on to the juicy bits. I'm going to describe my way of getting animated wheels - in the right place, at the right height & rotating.

There is a definite sequence which I've evolved from trial & error; with lots of failure & frustration along the way. This way works first time, every time.

With our side view live we can find the wheel axis. On the bottom bar you'll find a constant readout of the cursor position. We can see that, in this case, it's -0.8, 0.63.

For the first part of this tutorial we'll build wheels which are discs, the illusion of spokes will come with the texturing. So, we want a tube from the primitives. We know most of the dimensions we need. If we have dimensions & positions it will save a great deal of time.

By a stroke of luck and/or genius it's exactly where we want it to be.

Notice that it was offset by .75 in the 'x' axis. All measurements are in metres so I'll leave the "m" if I may. .75 isn't exact gauge - I'll show how to move things about. Sadly MSTS isn't to 4' 8 1/2" gauge. We're stuck with that - it's close but not exact. Don't ask me why not - ask Kuju!

I measured another wheel & found the centre of the tread is .768 - our's is at .75. - .018 too narrow. This is what you do - as Jimmy Young might say. In TSM you'll find a very powerful & useful tool - 'Transform'. We'll be using its drop-down menu often. The first thing we want to do is to move the axis of our wheel to zero in the 'x' axis. We're not interested in just one wheel, we want wheel sets. Pull down the 'Transform' menu, type in -0.75 in 'x' & tick the 'Axis Only' box.

See what's happened, without moving the wheel we've realigned the axis.

Now, without moving the axis, we want to adjust the gauge. Go into 'point' mode. To the right of the 'point' button is another - a dotted rectangle which is the multiple selection, lasso or whatever it should be called. Press this & drag a box to enclose the wheel. You might need a couple of attempts - it's very sensitive & greys out before you think it will. The points will have changed colour.

Back to the 'transform' menu. This time we want to move all of the highlighted points 0.018 outwards. You'll get used to the screen & which is right & left. It's confusing at first. It's easier to look at the top view. You've always got 'undo' - or 'Ctrl Z'; only one level in TSM.

We've now got one disc at the right gauge - we need a mirror image for the second. 'Edit', 'Copy', 'Paste' - you have a second disc superimposed on the first. If you press F2 it'll read "tube.1". Go back to 'Transform' - this time we have to 'Flip X'. We have two discs. It's beginning to look like a wheelset. Highlight the current disc - press the Space Bar, 'p' will make the first disc current. Highlight that also then go to 'part' on the toolbar & 'Join Selected'.

You should have saved the project once or twice by this stage.

It's still calling itself "tube". We have to give wheels names that MSTS recognizes. F2, you want the button 'Train Names'. Logic tells me that we've made "Wheels2"; we want "main" as 'Parent Part'. Change the colour while we're here.


Animation

You're not going to believe how simple it is. You'll see the 'Animation' button on the bottom right & "No animation" next to it. Press & you'll see a screen that has space for two types of animation - rotation & motion. Wheels will rotate only; our coupling rods will have motion only; the connecting rods will have rotation & motion. Remember we dumped a .rot file & saved another - above the 'Rotation' window is a 'Load' button. Press it & find your way back to the file you saved.


The rotation is just a regular progression. OK to finish. "No animation" will still be showing - next time you open the page it will show "Rotation".

Be brave! Press the 'ani' button on the toolbar. If you've filled the 'Project Properties' screen the bar will be live; slide it & the wheels will rotate.

Save 'wheels2' then load them - they'll be superimposed. F2; change "wheels2" to "wheels1" & change the value of the 'z' axis to 1.376. Notice that it shows "Rotation" now.


A Little Tweaking

We're close to seeing our B4 on the track. Before we can it's necessary to get it to sit on the track properly. Again although it sounds simple there's a deal of frustration hidden behind the learning process.

Load the file 'Rail Reference' that is in the TSM projects subdirectory. It's asymmetric in plan view ( I've corrected mine! ) but it doesn't matter - we're interested only in the side view. The height from datum is correct. See that the wheels are sunk deep into the track.

Here's another useful tool which TSM has up its sleeve. F3 - or the binocular icon - shows a list of the parts, just a shortcut for the 'part', 'Select by Name' menu.

Select everything but the Rail Reference.

OK, the parts will be highlighted. Press the 'move' button; lock 'x' & 'z' then lift the loco until the wheels just touch the rails. Shift + 'u' to deselect the parts; delete 'rail reference part. It has the 'Reference Part' button ticked - it wouldn't be included in the model.

Nearly there but THIS IS MORE IMPORTANT than people realize. The main part MUST have its datum reset to 0, 0, 0. At the moment the main part's datum is at the centre of the part. If we didn't change the datum the entire loco would be deep in the ground.

Make sure "main" is current, go to the 'part' menu - about half way down you'll see 'Center Axis' & an arrow. Press; then press 'To Origin' - job done.

Before we can think about animating anything it's worth ensuring that the loco sits properly, couples properly & has sensible values for its lengths. Bitter experience talking here! I was given answers to my frustrations on various forums. Although you can easily change the height & datum points any animation will have to be redone - v boring if you've just animated Walschaert's gear.


Exporting

We can now put our embryo loco on the tracks. 'Edit', 'Create TSM Object File'. You'll have to specify a folder for the loco, you can do this under the 'Browse' button. Again logic suggests B4_1. All of the boxes will be ticked, for the first export we want everything.

MSTS insists that EVERY part is textured.TSM will assign a blank texture, dark blue by default, to all untextured parts. Press 'Continue', with just a modicum of luck TSM will export your loco, you'll see a report screen, then a DOS type screen.

Your loco is now ready. Using the Activity Editor is covered by other tutorials. Build a consist & see your B4 at the head of a train.


Copyright Notice

Please read my copyright notice (click here)