How to Make Additions to an Alpha Channel Using Paint Shop Pro
by Paul DeVerter

A Port City Car Co. Project Copyright © 2004

Overview

My prior tutorial uses a relatively simple approach to making alpha channels in Paint Shop Pro. It was done entirely with the Selection Tools, and avoided all use of the "Mask" procedure. One thing I did not cover was how to add additional alpha areas to your texture files. The reason was, I had not figured it out. The more I tried, the more confused I became.


A Texture with Original Alphas

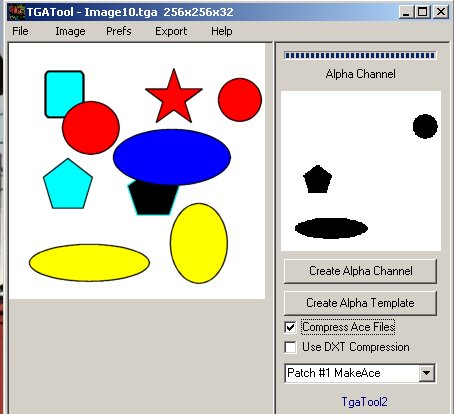
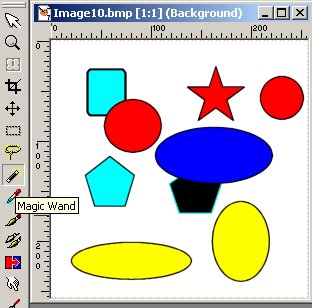
We'll start off assuming you have read and understand the How to Make an Alpha Channel tutorial. Since we are not going to make a project this time around, but only illustrate the principles of making the texture file, I will start off with an entirely different texture or bmp file. It could be a billboard, or a structure side, where you would like to have a series of see-through holes. Here is a BMP file to get us started:

The first thing to do is decide which areas are going to have the alpha channel, and thus end up transparent in the model. You need to pick a tool to do the job, so let's pick one of the Selection tools: here I have chosen the Magic Wand tool.

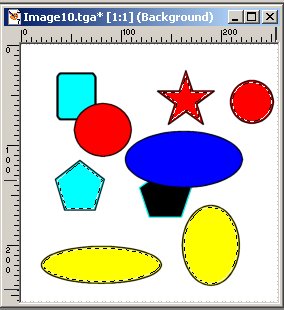
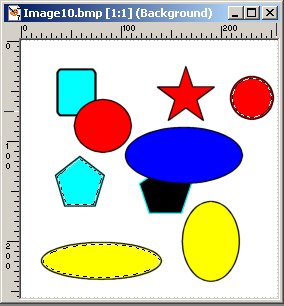
Now, lets select several areas for our project. Here I have clicked on the aqua pentagon, and then holding down the SHIFT key, have also selected the yellow ellipse and the red circle. You know they are selected because of the marching ants or marquees about these three selections.

What we have done is to select the areas that will not be masked out, and what we want to do is select the areas that will be alphaed out or become transparent. This is completely backwards to my logic, as what we want to select are the areas that are to be alphaed out. But if you look at this as masking, then what we have done is to protect the areas that we can not see through. So, we must Invert the selections, and we do that clicking Menu | Selections | Invert.

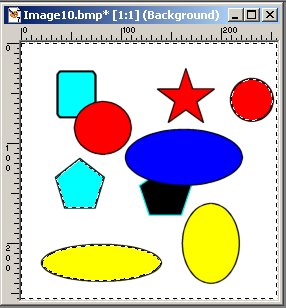
This results in the marquee now running around the outside of the texture as well as the three areas previously selected.

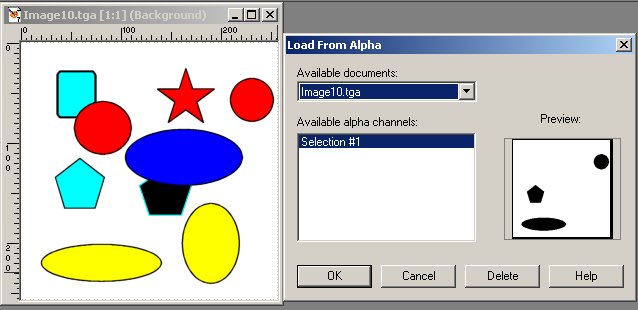
We need to save these selections to an alpha channel. This will complete our "Texture with Original Alpha" channels. Click on Menu | Selections | Save to Alpha Channel . A new window opens named Save to Alpha, and it has a Preview area.

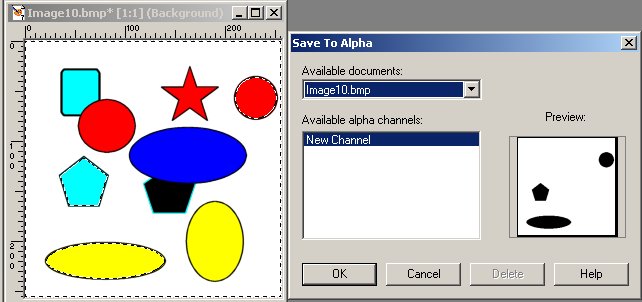
This shows what the alpha channel will be treating as transparent areas will look like. The three areas you selected to be transparent are shown in black, in the Preview of the alpha channel.

If it looks OK, and it does, then click on OK. A new window opens, called New Channel. It now has a name for the new alpha channel, and the default name is: Selection #1.

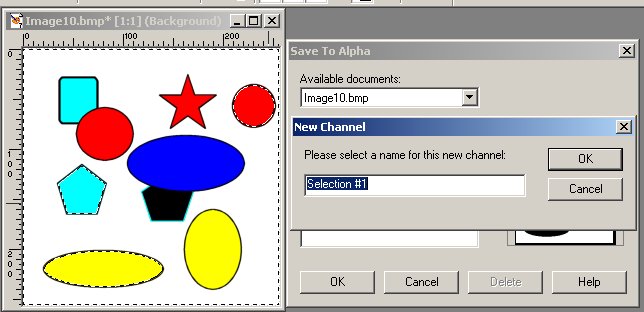
Overwrite with another name if you like, but remember that name. Then click OK, and we are back to the bmp file that we started with, before we did the alpha thing. That is, it still has the marquee or marching ants going around the outside.

We need to eliminate those. Press CONTROL-D (or right-click anywhere on the image), and the marquee (or marching ants) disappears, leaving what looks like the original bmp file. But, it is not identical as internally PSP has kept the alpha channel, which we just told it to save.

Save As the .BMP file as a .TGA file which will preserve the hidden alpha channel. Be sure you used the Options instructions in the earlier Tutorial. Notice the image now shows: TGA as the file type. Remember where you saved it.


Alpha Channel and TGATool2

To show or prove that the alpha is really there, let's next go to the TGATool2, and see what we have. Open that Utility, and click File | Load and find the TGA file which we just saved. Select that file, and click Open. Here is what you should have:

This is the proper .TGA file with the appropriate alpha channel, and the areas to be transparent are black. So you may now use the file to make whatever structure that you choose, and close out of it when done. Next comes the part where we add more areas to the alpha channel.


Adding to the Alpha Channel

After you have begun to texture your model, you may discover that you need to invoke even more alpha areas. How you do this little trick is the subject of the remainder of this tutorial. The secret is that we must get back to the state where we have the texture file showing the prior selections, and then add to them.

In PSP, bring up the .TGA file you Saved As a couple of steps ago. Click on Menu bar Selections | Load From Alpha Channel.

You will now see the .TGA file and the Load From Alpha window appears. In the Preview window you will see the same alpha has now shown up. It is Selection #1 - a name you were asked to remember. Click OK.

When you do, you are now back to the inverted file, where the marquee (or marching ants) is running around the outside of the texture, as well as about the items you had previously selected.

We need to return to the version as it was before we inverted the file, so that we can make more selections. Go to Menu Selections | Invert and click on Invert. This will remove the marquee from about the outside and put us back even one more step - namely back to where the selections are just around the original three areas.


Additional Selections

Recall that the first selections were made by holding down the SHIFT key, and clicking onto new areas with the Magic Wand Selection Tool. We are going to do the exact same thing. Hold down SHIFT and choose some more areas that you would like to become transparent. I have added the vertical yellow ellipse and the red star to our array.

Now we are going to repeat the same steps forward, just as we did before.

Go to Menu Selections | Invert and click on Invert. And guess what, the marquee is now traveling around the five selections we made, and also around the perimeter of the texture.

Next click on Menu Selections | Save to Alpha Channel. This will bring up the Save to Alpha window:

The difference is that we have two channels in the Available alpha Channels box, namely Selection #1 and New Channel. The New Channel shows in the Preview window all five of the areas we have selected, and the Selection #1 shows the alpha areas before we made the recent additions. If you are happy with the New Channel, then it is time to get rid of the no longer useful Selection #1.

Click on Selection #1 in the Available alpha channels box to make it active, and then click on Delete.

Up will come a further window asking "Are you sure you want to delete this alpha channel". Click Yes.

This brings you back to the Save to Alpha window once again. Click OK, and in the New Channel pop-up dialogue box that pops up, accept Selection #1 and click ok.

Just as before you need to remove the marquee by pressing the CONTROL-D key. SAVE the .TGA file with the added alpha areas. You are done, except for checking it out in TGATool.


Alpha Channel and TGATool, Again

You should know the drill. Open up the TGATool utility, and load the latest version of the .TGA file, and here is what you should have. The alpha channel now shows that you have successfully added additional alpha areas.


Conclusion

You have learned how to make a texture file with an alpha channel, and you have learned how to go into that file and add additional alpha areas at a later time. And all by using the Selection Tools of PSP, and avoiding the conscious use of "masks".

A final note: you do not need to use the Magic Wand, instead you can use any of the Selection Tools available.

Credits and Thanks to:

Tim Muir, Ted Ahner, Ed Hawkins.