A Steam Loco for MSTS Using 3DCanvas
by Paul "decapod" Gausden

Chapter 6 - Boiler, Funnel and Dome

Boiler

  1. Add a cylinder primitive to the scene.
     
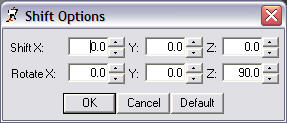
  2. Instead of rotating it this time, I'll shift rotate the object instead (no real reason, other than it's different to last time). I right click on the shift operation button and enter the following:

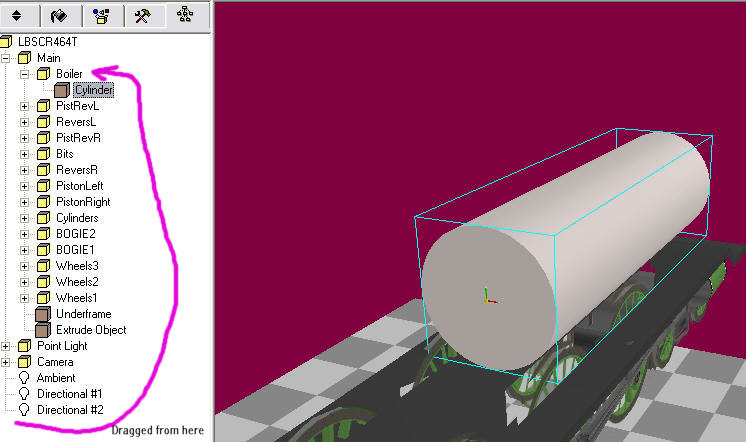
  3. Select the cylinder and click on the shift operation - the cylinder should now be in the correct alignment for a boiler.
     
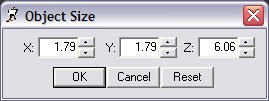
  4. Scale the cylinder to the right size:

  5. Depending on how many polys you want at the end of it all, at this point I usually adjust the number of cylinder sides with the Open Source option for the shape. The boiler is worth using a few more it because of its size and it helps with specular shine. I usually stick to between 20 and 30 sides.
     
  6. I run the shift centre plugin to the rear end of the cylinder to give myself a measuring point on the plan.
     
  7. Now drag the new group into the Main group and adjust the group position properties to x = 0.0, y=2.83 (from plan centre line + 0.1 for the flange), z = -0.1 (the back of the cylinder is almost on the centre of the model). I also rename the new group "Boiler".

Funnel and Dome...

(The more observant may notice a slight change in the size of the model here, but the principle is the same)

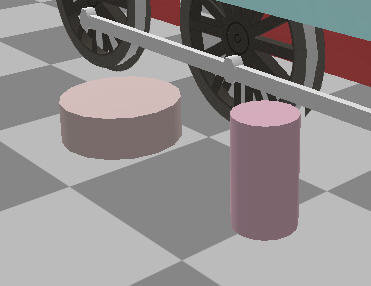
  1. From the plan, take a few measurements...

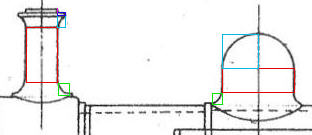
  2. Build two cylinders the same size as the red rectangles... no need to change the number of sides above 16 here, often I actually lower the number to 14 or 12 to cut out lots of polys.

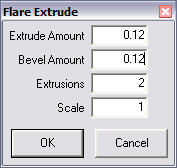
  3. Select the bottom face of the funnel object and run the "flare extrude" plugin. Enter the height and width or the green box as the extrude and bevel values - enter 2 and 1 for the other values. You could up the extrusions value to 3, but that makes more work later. Press OK.

  4. Do the same for the lower face of the dome object.
     
  5. Repeat for the pale blue rectangle of the funnel.
     
  6. For the dome top, repeat again, but this time the bevel value is negative half of the original cylinder diameter and the number of extrusions is increased to 3 (or 4 for extra smoothness).

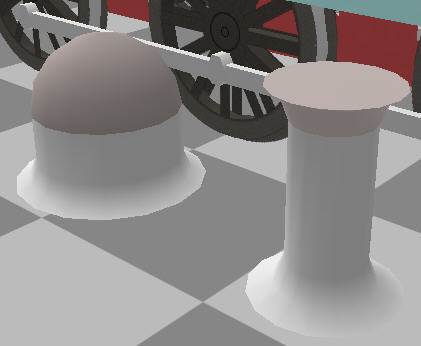
    (for Remembrance, I entered a smaller bevel size to give a more flat topped dome)

  7. The dome needs a bit of optimising, for this you need to select the object and run the "Weld to Range" plugin available from the amabilis web site. - Enter a value of about 0.03, it should say "15 points welded". Then run the "Optimize" object operation.
     
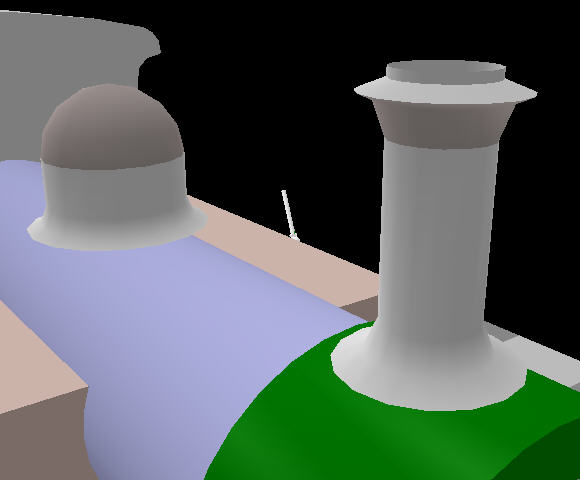
  8. I now use the standard Extrude Object Operation to add a small extrude with a negative bevel (dark blue box), then another extrude with 0.0 bevel for the top (purple line).
     
  9. You could leave a flat top, but for just a few extra polys, I add a negative extrude for just over the full height of the funnel and a small negative bevel - this makes the funnel hollow. Then delete the centre circle at the bottom of this extrude (and optimize the object).
     
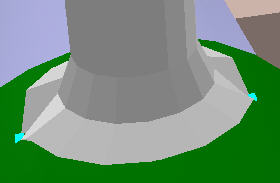
  10. Now drag both new cylinder groups onto the Boiler group and position the groups according to the plan - with the object selected, you can use the Ctrl up/down arrow keys to fine tune the height so the centre of the boiler top just touches the base of both objects.

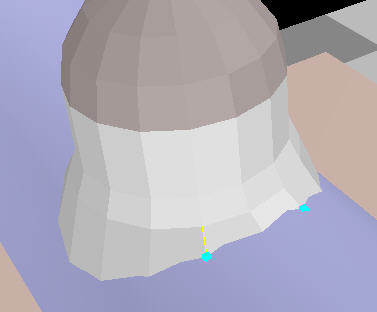
  11. Now use the Ctrl key to select both outside points, then move the cursor near one (till it turns yellow) and right drag the points downward simultaneously, till they touch the boiler top.

  12. Now select the four points next to these two (may require a bit of moving around as 3DC sometimes makes it hard to select these points) and repeat the simultaneous drag down with the right mouse button.

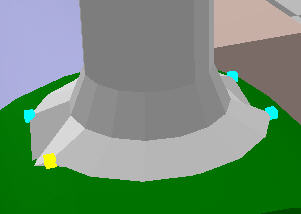
  13. Repeat again for the next four points, until you get to the centre line points.

  14. I also repeat steps 11 to 13 for some of the points on the next row up... not so critical on the funnel, but more important for the larger dome.

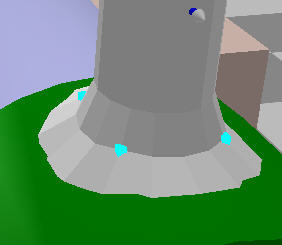
  15. Rrepeat 11 to 14 for the Dome.
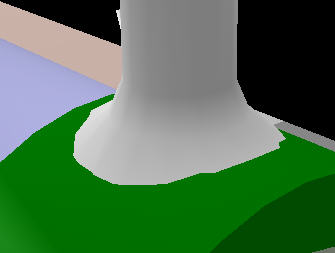
 < p>

Et Voila!


Q & A

Q: Richard Osborne

Vaguely keeping up. I had to load parts from the newest version onto the chassis from a previous version - before I lost the animation. I haven't tried animating the rods again.

Just built the boiler & fittings, using the extrude tool. Used your flair plug-in but used a hemisphere on top of the dome. I tried multiple points - as soon as I right click they unselect; found it just as quick to pick front, then rear.

It's getting easier as I'm learning the program though the constant crashing tries the patience a bit.

A: Paul Gausden

Unfortunately not much you can do about the crashes with windows 98 - more memory may help (and is relatively cheap)

I too moved from Windows ME to XP - the stability is great, not just for 3DC, but lots of other programs seem to behave better now.

There is a bit of a knack to multi-selecting and drag... Do the multi select of all points first, then move the mouse near one of the points so it turns yellow, then right click drag.

Q: Richard Osborne

I've just had a far more satisfactory session with 3dc - managed to sort out the animation. More important no crashes. I took the precaution of taking the bare chassis - in my case h16_2; saved it as h16_2anim before I started & carefully went through the tutorial again. I think I was expecting too much first time. This time I worked through animating one thing - checking it before moving to the next. In hindsight, after a couple of goose-chases, the tutorial makes sense.

I then went to the latest version, H16_6, & repeated the steps I'd just taken. I had to have 2 attempts at the port-side rods but it worked.

I had, as Decapod indicated, to realign the cylinders & guides. I did this with the animation still live - mistake. Having put animation onto these parts I couldn't see how to remove it - I can't find where 3dc records animation; F2 in TSM, just clear it if you make a mistake. Had to delete the parts, reload & move them. Rod animator obviously rewrites the crosshead group so just place the guides to the crossheads - assume there's no desaxe in the set-up.

The split face, create triangle & weld to range plug-ins have all been used - they fill in the gaps in 3dc & echo they way I build in TSM - something about old dogs! Managed to get that very pronounced kink in the front footplate.

A: Paul Gausden

To remove animations for a group...
Make the animation toolbar visible
Enter animation mode (press animate button)
Select the Group/object
Press the Black delete cross, Not the Red one!
Go back to modelling mode.

I also forgot to mention in the tutorial - one your funnel and dome are correct - remove the underside faces, lots of polys hidden there.

Q: Ian McMillan

I have just about caught up, although I will hold off adding shading and weathering to the textures until nearer completion.

I have the following observations on the instructions for this lesson:
1) using the shift operation with the given values, to lay the boiler over, you should specify the coordinate system you are using. I usually use world coordinates, so it would be 90 degrees around the X axis.
2) to use the plugin to move the axis to one end of the boiler, you need to select the end face then run the plugin. (there are no instructions on how this plugin works).
3) Doing the top of the dome, did you use 3 or 4 extrusions for the third parameter to the plugin?
4) No mention of deleting the bottom faces from the funnel and dome.
Other than that, a splendid lesson. The plug-ins really help with accuracy. I did the funnel and dome for the Terriers using the lathe tool, a lot of guesswork and estimation. I ended up building a huge funnel and then scaling it down in size to get a more accurate shape.

A: Paul Gausden

Thanks Ian,

I forgot to mention I was using the default edit mode, not world coordinates.
3) I used 4 as the 3rd parameter (sorry forgot that)
4) I added that to the end of the previous post.

Q: Richard Osborne

Being really rash now - animating valvegear! All going well but... both eccentric rods leap to the right, only about .1m but the port side rod sinks into the eccentric crank. I've tried a couple of times with the same result.

Any ideas? I'm using the plug-in & following the words.  I'd used the black cross to lose animation - a screen appeared & I couldn't reanimate the part. Used the red cross on h16_4, hence h16_5. It would be far better if the two crosses were distinctly different & not close to each other.

A: Paul Gausden

It sounds like you may have moved the object whilst in animation mode... luckily I wrote a plugin for this situation (which has happened to me from time to time).

Whilst in modelling mode, select the affected object (and make sure it is in the correct position) then run the Fix Animation Positions Plugin (or script if you have it) - this plugin removes all translational movement, but retains rotations - all of our animations, except for the piston motion should be purely rotational.

If that's not the problem, I may need to take a peek at the 3DC file to see what's happening.

Re black/red crosses:You're not wrong there  The warning messages could do with big red flashing letters - I've used the wrong one more than once.

Go To Chapter 9