Once you've got the tools, you need something to do with them, so we need to pick a suitable subject. Everyone has their favorite livery. For a locomotive such as the SD45 there are literally thousands of individual locomotives to choose from. For the purposes of this tutorial I have chosen CSX #8903 as the subject. You do not have to base your project on this particular locomotive. It can be any other one of your choosing. The principles remain the same no matter which unit you choose, but if this is your first repaint, I strongly suggest that you pick a simpler designs until you are throughly familiar with the process.
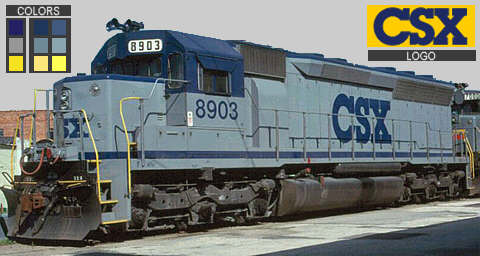
One of the best place to do research is on the Internet. Find color photos of the engine that you like and once you have selected one, also do a search for the correct logo. There are many train fan sites on the Internet, so it should not be difficult to find everything that you will need for your project. Just make sure, as much as possible, to get as many shots as you can of the same locomotive and also that the photos are of relatively good quality.
Using WinZip, unpack James' SD45 model following the attached instructions to install the model. Always un-zip MSTS model files to a temporary location and move the needed files into the TRAINSET directory. In this package especially, because it was not packed quite correctly, there are a few additional (empty) folders that were inadvertently packed. Move only the folder named SD45-SF5346 into the TRAINSET folder. Once it is installed, go into the CABVIEW folder and delete the file named 3dts_gp20_sp.cvf as this is not needed.
Using ConBuilder, make a consist file for this model and take it for a good spin in the simulator. Look at the model very closely from all angles so that you have a good gauge of what you are about to attempt to do. Look at it under different lighting and weather conditions until you have a through familiarity of the model and it's characteristics. This SD45 is an older model and is a little bit simpler than the more recent versions that are now available. However, it is a faithful and otherwise excellent reproduction of the prototype. It's relative simplicity is why I have chosen this as the subject for this project as it is easy for a beginner to repaint.
Copy the entire SD45-SF5346 folder and rename it SD45-CSX5309. You will need to rename and edit certain files to create your own version. The files that need to be renamed and edited are:
| Original File Name: | New File Name: | Edits Required: |
|---|---|---|
| SD45_SF5346.s | SD45_CSX8903.s | No edits needed. |
| SD45_SF5346.sd | SD45_CSX8903.sd | Change the line that reads: shape ( SD45_SF5346.s to read: shape ( SD45_CSX8903.s |
| SD45_SF5346.eng | SD45_CSX8903.eng |
Change the line that reads: WagonShape ( SD45_SF5346.s ) to read: WagonShape ( SD45_CSX8903.s ) Change the 2 occurences of: wagon ( SD45_SF5346 ) to read: wagon ( SD45_CSX8903 ) Scroll down until you see: Name ( "SF SD45 #5346" ) change this to read: Name ( "CSX SD45 #8903" ) |
Use WordPad to do the editing and make sure that you have done the following:
- To retain the exact same format including spaces
- To resave the files as an Unicode text document
Make a new consist using the new version of the locomotive. Make sure it appears in the simulator. Right now it looks identical to SF5346, and that is fine as we have not repainted it yet.
If you have chosen to repaint a version other than CSX 8903, just use a nomenclature appropriate to your chosen version. Just make sure that you follow the formats given above. So for example, if you have chosen to paint your SD45 as BN #400, substitute SF5346 with BN400 (note no spaces).
[ Top of Page ] [ Prev ] [ Next ]
Copyrights © 2004-2007, Sean Lim. All Rights Reserved. Hosted courtesy of steam4me with permission.