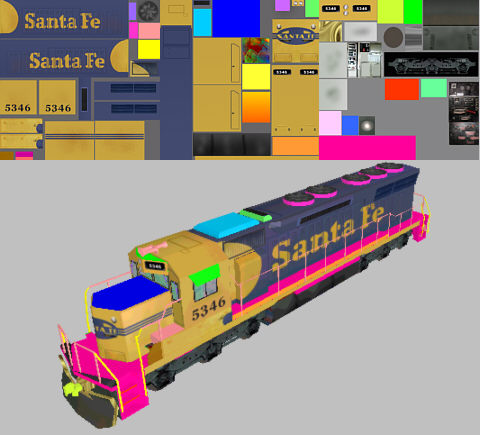
Each part of a model is mapped somewhere its texture map. It is important to figure out the relationship between the model and its source texture map. Looking at the SD45 texture map set, some pieces are obvious as to where they have been applied to the model. Others less so. There are different methods to figure what goes where.For the SD45 the easiest way and this method can be applied to all models, paint pieces that you cannot readily identify bright solid colors. Convert the textures back into ace-files and look at the model in SVIEW or MSTS to see what texture piece goes where. It is very important that you have a thorough understanding of where all the texture pieces go before starting to repaint a model.
One of the most important things is to identify potential problems. On the SD45 model, part of the front of the deck derives its mapping from the fuel tanks. This may be troublesome for some liveries, especially any that has a different deck color from the fuel tanks. To fix this you will normally have to contact the modeler to have the model's mapping changed. Or you can try to work around the problem. On this model, the deck texture is also used behind the bogies, for the stairwell sides and smaller tanks on the left and right sides of the unit. This is going to limit the options severely. So what to do?
CSX SD45 #8903 has a grey stairwell and most probably a grey deck. The underchassis areas were probably originally painted black. A quick search around the Web revealed some inconsistencies as to how the selected blue / grey scheme seems to have been applied to CSX SD45s. For the purposes of this tutorial, I will be taking the least line of resistance and follow the lead of Lifelike's Proto 2000 model of CSX SD45 #8901who they will have us believe that the entire deck and underchassis was painted in CSX blue. Unfortunately, sometimes compromises do have to be made ...

[ Top of Page ] [ Prev ] [ Next ]
Copyrights © 2004-2007, Sean Lim. All Rights Reserved. Hosted courtesy of steam4me with permission.